Creating Plugins
This section is aimed at developers who want to build their own plugins for CST. The procedure has the following steps:- create a Java class which implements the interface GeneralPurposePluginAPI or SubjectInformationServiceAPI.
-
create a *.jar file for your plugins and place it in the
./lib/pluginsdirectory. - Modify the configuration file to specify your plugins.
The best way to see how plugins work is to move the file ./doc/sample_files/SampleDataModelWithPlugins.xml
to the models directory at ./models. When you run the Logging Tool, you will be able to see the
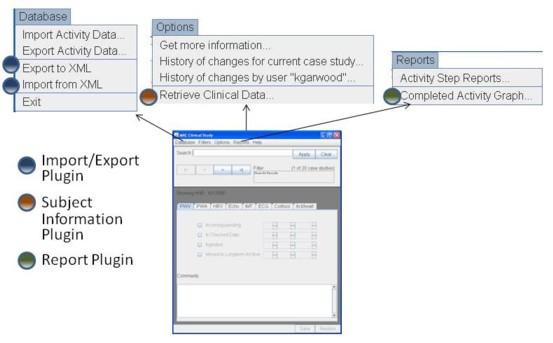
plugins advertised in the menu bar. Figure Create-Plugins-1 shows the three types of plugins which
are supported:
- import and export plugins which load and save data
- subject information plugins which retrieve information about the current subject.
- report plugins which display reports about data.

Create your Plugin
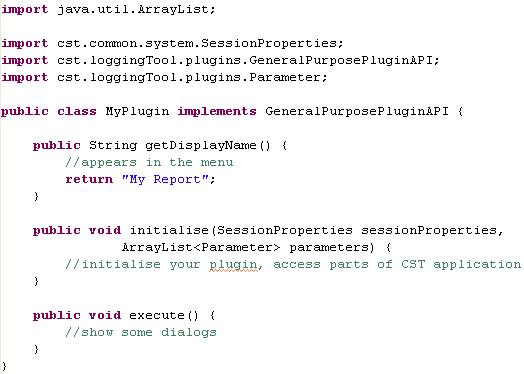
The following snapshot shows you what the code skeleton for a plugin might look like:
When you finish writing your plugin, create a JAR file for it and place that file in
./lib/plugins.
Alter the Configuration File
Use./doc/sample_files/SampleDataModelWithPlugins.xml as an example. You can
specify the configuration as in the following snapshots. Note that if you do not specify a
tag for class_name, then CST creates a stub plugin which simply shows users
the information you filled in for the other plugin configuration tags.

Figure Configuration-Example-1: Configuration for an import or export plugin.

Figure Configuration-Example-2: Configuration for a stubbed plugin.

Figure Configuration-Example-3: Configuration for a subject information service plugin.

Figure Configuration-Example-4: Configuration for a report plugin.
Author: Kevin Garwood
(c)2010 Medical Research Council. Licensed under Apache 2.0.
